Students
need to bring a baby picture and their birth information to school.
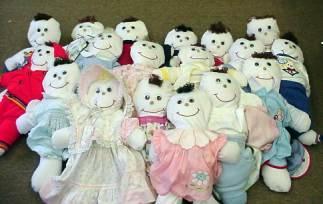
Students
chose one shade of fabric for their baby. (I just bought the same
shade for all the students.)
A
volunteer then cut and sewed the babies, making each baby about 19
inches long and about 10 inches wide.
The
top of the baby's head was left open so that the baby could be
filled.
The
students then used their estimation skills to fill their babies with
rice until they believed their baby was at the correct birth
weight. Sometimes they needed to add more rice, and sometimes
they needed to pour some out. ( I used washers for the heavier
babies.)
The
owner of the local grocery store brought his meat scale and helped
each child get their baby to the correct birth weight.
After
the babies were the correct birth weight the students took their
baby to the next station. I had many volunteers waiting to sew
the top of the baby's head shut.
Next,
the students proceeded to the final station. A volunteer
helped them glue on their eyes, nose, and hair. We used
hot-glue guns at this station.
Finally,
the boys and girls got to dress their baby in baby clothes.
They brought these clothes from home and many parents sent extras.
I
took many pictures of this activity with my digital camera. I
then made a "Me" Baby page in their scrapbook that I gave
to them at the end of the school year.
|